Removing Empty Lines and whitespaces genereted by JSP

I have been working on a JSP page which was generating emtpy lines & extra whitespaces. I found an Oracle’s document mentioning about this issue.

Here’s what document says

“White space included in the template text of JSP pages is preserved by default. This can have undesirable effects. For example, a carriage return added after a taglib directive would be added to the response output as an extra line. If you want to eliminate the extra white space from the page, you can add a trim-directive-whitespaces element to a jsp-property-group element in the deployment descriptor and set it to true.”

There are two ways in which this issue can be solved.


  1. Insert the following directive in your JSP file
<%@ page trimDirectiveWhitespaces="true" %>


2.Add the following configuration to your web.xml

<init-param>
    <param-name>trimSpaces</param-name>
    <param-value>true</param-value>
</init-param>

Hope this helps you.

Sample JSP code for a Complete Web Login System

Useful JSP code to implement a secure Login system. You can deploy the below sample JSP code for a Complete Web Login System on any Servlet/JSP container like Tomcat

login.jsp

<%@page contentType="text/html" pageEncoding="UTF-8"%>
<html>
    <head>
        <meta http-equiv="Content-Type" content="text/html; charset=UTF-8">
        <title>JSP Page</title>
    </head>
    <body>
        <h1>Login Page</h1>
        <center>
        <%
    if(null!=request.getAttribute("errorMsg"))
    {
        out.print(request.getAttribute("errorMsg"));
    }
        %>
            <form action="Check.jsp" method="post">
           <pre/> <br/>Username:<input type="text" name="username">
            <br/>Password:<input type="password" name="password">
            <br/><input type="submit" value="Submit">
            </form>
        </center>
    </body>
</html>

logout.jsp

<%@page contentType="text/html" pageEncoding="UTF-8"%>
<html>
    <head>
        <meta http-equiv="Content-Type" content="text/html; charset=UTF-8">
        <title>JSP Page</title>
    </head>
    <body>
        <%
        session.removeAttribute("username");
        session.removeAttribute("password");
        session.invalidate();
        %>
        <h1>You're Successfully Logged out. Redirecting you back to Login page...</h1>
<%      response.sendRedirect("ping.jsp"); %>
        </body>
        </html>

ping.jsp

<html>
<head>
<meta http-equiv="Content-Type" content="text/html; charset=ISO-8859-1">
<meta http-equiv="refresh" content="120">
<title>URL Monitor</title>
</head>
<body>
<%
if (session.getAttribute("username") == null || session.getAttribute("username").equals(""))
{
//out.print("Error : Unknown Login");
//response.setHeader("Refresh", "5;url=login.jsp");
request.setAttribute("errorMsg","Please enter your Credentials to Login");
request.getRequestDispatcher("login.jsp").forward(request, response);
//response.sendRedirect("login.jsp");
}
<a href="logout.jsp">Logout</a>
//All Stuff for Logged in user goes here
</body>
</html>

Error.jsp

<%@page contentType="text/html" pageEncoding="UTF-8"%>

<html>
    <head>
        <meta http-equiv="Content-Type" content="text/html; charset=UTF-8">
        <title>JSP Page</title>
    </head>
    <body>
        <h1>Some Error has occured,Please try again later...</h1>
        <a href="/login.jsp">Click here to Go back and Login again</a>
    </body>
</html>

Check.jsp

<%@page contentType="text/html" pageEncoding="UTF-8"%>
<html>
    <head>
        <meta http-equiv="Content-Type" content="text/html; charset=UTF-8">
        <title>JSP Page</title>
    </head>
    <body>
        <%
        String username=request.getParameter("username");
        String password=request.getParameter("password");

        if((username.equals("test") && password.equals("test")))
            {
            session.setAttribute("username",username);
            response.sendRedirect("ping.jsp");
            }
        else
            response.sendRedirect("Error.jsp");
        %>
        </body>
        </html>


Sample JSP code to Monitor Website URLs

This sample JSP code can be used for monitoring any Simple Web Applications or Websites in your internal network as well as over internet. Just create save it with a .jsp extension (For Example index.jsp) & deploy onto a Tomcat or any other J2EE server.

Following is the sample JSP code to Monitor Website URLs. I have tested it & it works fine. In the following code you need to replace the value of variable “monitor1” with your Domain name or Application URL

<%@page import="java.net.ConnectException"%>
<%@ page language="java" contentType="text/html; charset=ISO-8859-1"
    pageEncoding="ISO-8859-1"%>
    <%@ page import="java.net.HttpURLConnection" %>
    <%@ page import="java.net.URL" %>
    <%@ page import="java.io.IOException" %>
    <%@ page import="java.net.HttpURLConnection" %>
    <%@ page import="java.net.URL" %>
    <%@ page import="java.net.Authenticator" %>
    <%@ page import="java.net.PasswordAuthentication" %>
    <%@ page import="java.io.IOException" %>
    <%@ page import="java.text.SimpleDateFormat" %>
<!DOCTYPE html PUBLIC "-//W3C//DTD HTML 4.01 Transitional//EN" "http://www.w3.org/TR/html4/loose.dtd">
<html>
<head>
<meta http-equiv="Content-Type" content="text/html; charset=ISO-8859-1">
<meta http-equiv="refresh" content="120">
<title>URL Monitor</title>
</head>
<body>
<%


String monitor1="http://www.serverliving.com/";
HttpURLConnection rmonitor1 = ( HttpURLConnection ) new URL( monitor1 ).openConnection();

String bg="";
SimpleDateFormat time_formatter = new SimpleDateFormat("dd-MM-yyyy::HH:mm");
String current_time_str = time_formatter.format(System.currentTimeMillis());
out.print("<center/><h3>Current Time: "+current_time_str+"</h3>");
out.print("<table align=center border=1>");
out.print("<tr><th>APPLICATION</th><th>URL</th><th>STATUS</th></tr>");

try{
out.print("<tr><td>My Application Name</td>");
out.print("<td>"+monitor1+"</td>");
if(rmonitor1.getResponseCode() == 200){bg="#66ccff";}else{bg="#ff6600";}
out.print("<td bgcolor="+bg+">"+rmonitor1.getResponseCode()+"</td></tr>");
} catch (Exception e) {
        out.print("<td bgcolor=#ff6600>Connection Failed</td>");
}

%>
</body>
</html>

If your monitoring server requires proxy authentication, you can simply add following code for Proxy Authentication

System.getProperties().put("http.proxyHost", "proxyHost.com");
System.getProperties().put("http.proxyPort", "9090");
System.setProperty("https.proxyUser", "Proxy_username");
System.setProperty("https.proxyPassword", "Proxy_password");
Authenticator.setDefault(new Authenticator() {
    @Override
    protected PasswordAuthentication getPasswordAuthentication() {
        if (getRequestorType() == RequestorType.PROXY) {
            String prot = getRequestingProtocol().toLowerCase();
            String host = System.getProperty(prot + ".proxyHost", "");
            String port = System.getProperty(prot + ".proxyPort", "80");
            String user = System.getProperty(prot + ".proxyUser", "");
            String password = System.getProperty(prot + ".proxyPassword", "");
            if (getRequestingHost().equalsIgnoreCase(host)) {
                if (Integer.parseInt(port) == getRequestingPort()) {
                    return new PasswordAuthentication(user, password.toCharArray());
                }
            }
        }
        return null;
    }
});

Any suggestions or improvments to this code are welcome.

3 steps to connect Jconsole to remote Tomcat7 from Windows

In this post i will show you 3 steps to connect Jconsole to remote Tomcat7 from Windows-7.

Jconsole tool is a JMX ready GUI tool for monitoring a Java virtual machine. Using this tool, you can monitor real-time status of your application server threads, memory,cpu,MBeans, active sessions etc.

My Local machine environment is below

  • Local JDK -> JDK 1.7
  • Operating System -> Windows7 64-bit

My Remote server details

  • Remote JDK -> JDK 1.7
  • Operating system -> Linux
  • Application server -> Tomcat-7.0.63

STEP1: Download & Install JDK 1.7 from Oracle website onto your Windows desktop

Here is the link to download Click Here


STEP2: Enable JMX access on your remote Tomcat server

To enable JMX access, you need to edit catalina.sh which can be found inside $CATALINA_HOME/bin/ directory.


Edit catalina.sh & append following JVM parameters to JAVA_OPTS. On my server, this entry was located in line #98


JAVA_OPTS="${JAVA_OPTS} -Xms2048M -Xmx2048M -Dcom.sun.management.jmxremote 
-Dcom.sun.management.jmxremote.port=9991 
-Dcom.sun.management.jmxremote.authenticate=false 
-Dcom.sun.management.jmxremote.ssl=false 
-Djava.rmi.server.hostname=20.20.20.20


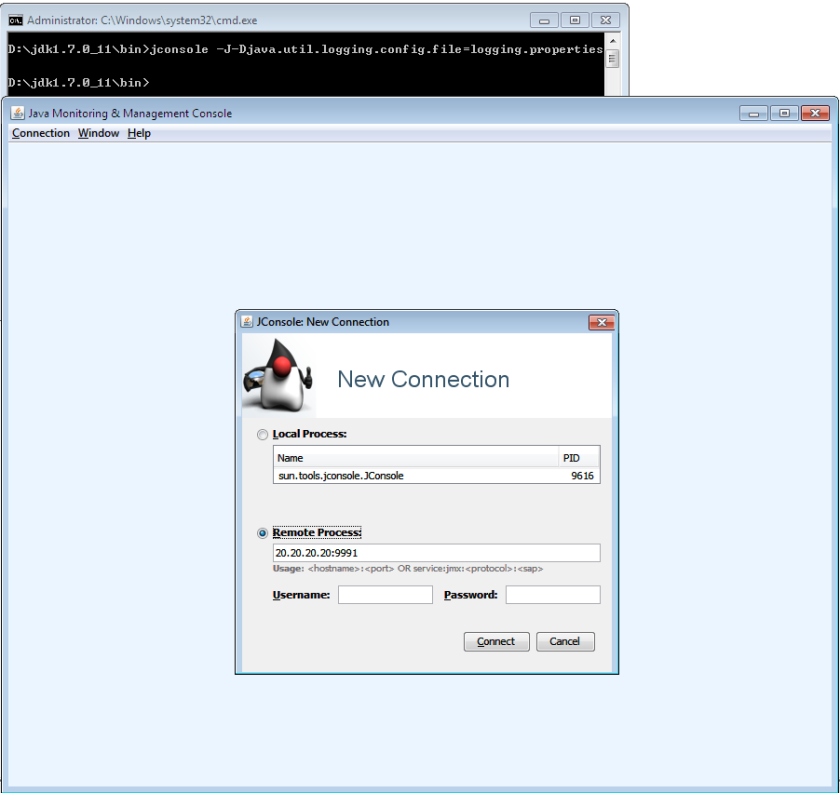
STEP3: Launch Jconsole on your Windows desktop from command prompt using below command.

jconsole -J-Djava.util.logging.config.file=logging.properties

If you want to enable logging for debugging purpose, you can enable it using below method.

my logging.properties looks like below

logging.properties
handlers = java.util.logging.ConsoleHandler
.level = INFO
java.util.logging.ConsoleHandler.level = FINEST
java.util.logging.ConsoleHandler.formatter = 
java.util.logging.SimpleFormatter
// Use FINER or FINEST for javax.management.remote.level - FINEST is
// very verbose...
javax.management.level = FINEST
javax.management.remote.level = FINER

Once everything is setup, You can start Jconsole & connect to your Tomcat JMX port as shown below.

jconsole-1


Configuring custom error pages in Tomcat

Since tomcat doesn’t come with user friendly messages when an error occurs. This situation can be handled by Configuring custom error pages in Tomcat.

Tomcat-error-404


The most common type of error messages are 404, 400 & 500 . As the tomcat’s default error pages expose the Version of tomcat, it’s important to hide the version information as part of security best practices.

Let’s get started with the configuration stuff now.
I have installed Tomcat under /opt so my CATALINA_HOME value is /opt/apache-tomcat-7.0.63/

STEP1: Tomcat Configuration

Edit /opt/apache-tomcat-7.0.63/conf/web.xml and add the following configuration just before </web-app>

<error-page>
<error-code>404</error-code>
<location>/404.html</location>
</error-page>

<error-page>
<error-code>500</error-code>
<location>/500.html</location>
</error-page>
<error-page>
<error-code>400</error-code>
<location>/400.html</location>
</error-page>


STEP2: Creating custom error pages.

I have deployed my application as ROOT, so i will place my 3 custom error html files under /opt/apache-tomcat-7.0.63/webapps/ROOT/
Now create 3 seperate html files called 404.html, 500.html & 400.html

touch 404.html 500.html 400.html

Now i will update these files with suitable error messages.

STEP3: Restarting Tomcat server

Once you restart tomcat server, try to access any non existing URL on the server & you should be able to see custom error messages as you created


Configuring tomcat 7 to run with custom JSESSIONID

As you might be aware, Tomcat’s default session cookie name is JSESSIONID. In some situations you will  be required to run a Tomcat instance with a different JSESSIONID cookies for all applications .

We had a similar requirement, we had 3 web applications running on 3 different context roots on same tomcat server & those applications were running on Single Sign on basis. While testing we have observed that the application was not maintaining the session properly & user was always redirected back to Login screen.

On some debugging we realized that we need to modify one of the applications JSESSIONID cookie name.

Here i will show you how we configured tomcat to run with custom JSESSIONID cookie name.


Open your tomcat’s server.xml (apache-tomcat-7.0.63/conf/server.xml) file & edit like below.


 <Engine name="portal" defaultHost="localhost">
        <Host name="localhost"  appBase="/opt/myapp/portal/webapp"
              unpackWARs="true" autoDeploy="true">

                <Context path="/" sessionCookieName="JSESSIONID_PORTAL"></Context>

            <Valve className="org.apache.catalina.valves.AccessLogValve" directory="logs"
                   prefix="portal_access_log." suffix=".txt"
                   pattern="%h %l %u %t &quot;%r&quot; %s %b" />

        </Host>
    </Engine>

Here we created a seperate Engine for our application which was running on / context root & added the attribute sessionCookieName.

After doing these changes we had restarted the tomcat server and the application session was then working perfectly.

Hope this helps someone.