net stats srv
Top 3 Best Java Decompilers
Luyten – https://deathmarine.github.io/Luyten/
jadx – Dex to Java decompiler – https://sourceforge.net/projects/jadx/
JD-GUI – http://jd.benow.ca/
How to use curl Command to submit a HTML Form with File upload
If your HTML form has 2 parameters say description (text-type) & ImageFile(file-type), You can use below Bash command to upload that file with desciption
curl -F “description=My Text File” \
-F “ImageFile=@/home/admin/filename.txt” \
http://www.domain.com/upload.php
How to reset your Lost VestaCP admin password
In this post I will show you how to reset your Lost VestaCP admin password.
There are two methods to reset password for “admin” user in VestaCP. “admin” user in VestaCP is registered as a SSH user and all other VestaCP accounts are registered in the same way hence it makes easy for you to reset the admin password if you have knowledge of basic Linux commands.
METHOD1:
The following command is recommended by VestaCP for resetting admin password. Login to your server via SSH & execute the one liner as shown below
v-change-user-password admin secret
Here “secret” is the new password we have set, You can provide a stronger password here.
METHOD2:
This method uses standard Linux passwd command to reset the password. Just execute the passwd command & provide your secure password at the Prompt as shown below & you’re done.

Step-by-Step: Connecting to Apache HiveServer2 from SquirrelSQL
In this Article I will show you how to Connect SquirrelSQL with HiveServer2.
Apache Hive is a Data warehouse software using which we can Read/Write & manage large datasets residing on distributed Storage systems like Hadoop using SQL Language.
HiveServer2 (HS2) is a server interface that enables remote clients to execute queries against Hive and retrieve the results. By default Hive Server runs on port 10000 & various clients can connect to it & manage the Data over there.
Firstly we need to Download the latest version of Hive Server and install it on a server if you do not have already. Document to install HiveServer2 is avaiable Here
I have installed my setup of HiveServer2 on a CentOS 6.7 machine on port 10000
I am using Hadoop 2.7.1 HDFS as distributed storage for Hive & Metadata gets stored in Derby database.
Connecting through SquirrelSQL 3.7
Step1:
Your First step will be downloading SquirrelSQL client, Which can be downloaded from Here http://squirrel-sql.sourceforge.net/#installation
You can simply extract the downloaded Package & run it by double clicking or Executing the executable JAR file squirrel-sql.jar
NOTE: Please note that SquirrelSQL runs requires Java on your machine, Make sure you have installed JRE on your PC.
Step2:
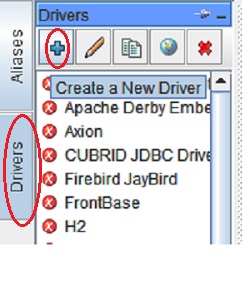
In this step we will Configure a Driver for Hive Server. To Configure a new driver Click on the Drivers Tab on the Left sidebar & Plus Sign as shown below.
Now we need to pass various values like Alias Name, Example URL which will be the default URL for every new Connection.
Name: This value can be any String, You can name it as “Hive”
Example URL: Provide value as jdbc:hive2://REMOTE_SERVER:10000/db_name where db_name is the database which you created or you can simply connect to default database. Leave website URL as Empty.
Now click on the tab “Extra Class Path” & add all the JAR files which are shown below.
These JAR files needs to be downloaded from the Hive server’s lib directory.
Once you have added the JAR files, Select all JAR files & click on “List Drivers” button. Clicking on this button should display the below class name “org.apache.hive.jdbc.HiveDriver” after “Class Name” label.
Verify & click on “OK” button.
Step3:
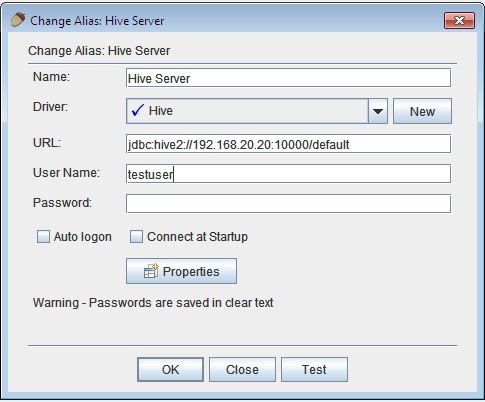
In this step, We will create an Alias for Connecting with Hive server, You need to configure the Alias settings as shown below.

If your Hive Server is connected to Hadoop HDFS storage, Make sure to provide required username in the username field.
Once all the settings are Saved, Verify if the connection is working properly by clicking on “Test” button
If you see “Connection Successful” message, You’re done.
Feel free to Comment here if you face any issues during the setup.
Removing Empty Lines and whitespaces genereted by JSP
I have been working on a JSP page which was generating emtpy lines & extra whitespaces. I found an Oracle’s document mentioning about this issue.
Here’s what document says
“White space included in the template text of JSP pages is preserved by default. This can have undesirable effects. For example, a carriage return added after a taglib directive would be added to the response output as an extra line. If you want to eliminate the extra white space from the page, you can add a trim-directive-whitespaces element to a jsp-property-group element in the deployment descriptor and set it to true.”
There are two ways in which this issue can be solved.
- Insert the following directive in your JSP file
<%@ page trimDirectiveWhitespaces="true" %>
2.Add the following configuration to your web.xml
<init-param>
    <param-name>trimSpaces</param-name>
    <param-value>true</param-value>
</init-param>
Hope this helps you.
Sample JSP code for a Complete Web Login System
Useful JSP code to implement a secure Login system. You can deploy the below sample JSP code for a Complete Web Login System on any Servlet/JSP container like Tomcat
login.jsp
<%@page contentType="text/html" pageEncoding="UTF-8"%>
<html>
    <head>
        <meta http-equiv="Content-Type" content="text/html; charset=UTF-8">
        <title>JSP Page</title>
    </head>
    <body>
        <h1>Login Page</h1>
        <center>
        <%
    if(null!=request.getAttribute("errorMsg"))
    {
        out.print(request.getAttribute("errorMsg"));
    }
        %>
            <form action="Check.jsp" method="post">
           <pre/> <br/>Username:<input type="text" name="username">
            <br/>Password:<input type="password" name="password">
            <br/><input type="submit" value="Submit">
            </form>
        </center>
    </body>
</html>
logout.jsp
<%@page contentType="text/html" pageEncoding="UTF-8"%>
<html>
    <head>
        <meta http-equiv="Content-Type" content="text/html; charset=UTF-8">
        <title>JSP Page</title>
    </head>
    <body>
        <%
        session.removeAttribute("username");
        session.removeAttribute("password");
        session.invalidate();
        %>
        <h1>You're Successfully Logged out. Redirecting you back to Login page...</h1>
<%      response.sendRedirect("ping.jsp"); %>
        </body>
        </html>
ping.jsp
<html>
<head>
<meta http-equiv="Content-Type" content="text/html; charset=ISO-8859-1">
<meta http-equiv="refresh" content="120">
<title>URL Monitor</title>
</head>
<body>
<%
if (session.getAttribute("username") == null || session.getAttribute("username").equals(""))
{
//out.print("Error : Unknown Login");
//response.setHeader("Refresh", "5;url=login.jsp");
request.setAttribute("errorMsg","Please enter your Credentials to Login");
request.getRequestDispatcher("login.jsp").forward(request, response);
//response.sendRedirect("login.jsp");
}
<a href="logout.jsp">Logout</a>
//All Stuff for Logged in user goes here
</body>
</html>
Error.jsp
<%@page contentType="text/html" pageEncoding="UTF-8"%>

<html>
    <head>
        <meta http-equiv="Content-Type" content="text/html; charset=UTF-8">
        <title>JSP Page</title>
    </head>
    <body>
        <h1>Some Error has occured,Please try again later...</h1>
        <a href="/login.jsp">Click here to Go back and Login again</a>
    </body>
</html>
Check.jsp
<%@page contentType="text/html" pageEncoding="UTF-8"%>
<html>
    <head>
        <meta http-equiv="Content-Type" content="text/html; charset=UTF-8">
        <title>JSP Page</title>
    </head>
    <body>
        <%
        String username=request.getParameter("username");
        String password=request.getParameter("password");

        if((username.equals("test") && password.equals("test")))
            {
            session.setAttribute("username",username);
            response.sendRedirect("ping.jsp");
            }
        else
            response.sendRedirect("Error.jsp");
        %>
        </body>
        </html>
Sample JSP code to Monitor Website URLs
This sample JSP code can be used for monitoring any Simple Web Applications or Websites in your internal network as well as over internet. Just create save it with a .jsp extension (For Example index.jsp) & deploy onto a Tomcat or any other J2EE server.
Following is the sample JSP code to Monitor Website URLs. I have tested it & it works fine. In the following code you need to replace the value of variable “monitor1” with your Domain name or Application URL
<%@page import="java.net.ConnectException"%>
<%@ page language="java" contentType="text/html; charset=ISO-8859-1"
    pageEncoding="ISO-8859-1"%>
    <%@ page import="java.net.HttpURLConnection" %>
    <%@ page import="java.net.URL" %>
    <%@ page import="java.io.IOException" %>
    <%@ page import="java.net.HttpURLConnection" %>
    <%@ page import="java.net.URL" %>
    <%@ page import="java.net.Authenticator" %>
    <%@ page import="java.net.PasswordAuthentication" %>
    <%@ page import="java.io.IOException" %>
    <%@ page import="java.text.SimpleDateFormat" %>
<!DOCTYPE html PUBLIC "-//W3C//DTD HTML 4.01 Transitional//EN" "http://www.w3.org/TR/html4/loose.dtd">
<html>
<head>
<meta http-equiv="Content-Type" content="text/html; charset=ISO-8859-1">
<meta http-equiv="refresh" content="120">
<title>URL Monitor</title>
</head>
<body>
<%


String monitor1="http://www.serverliving.com/";
HttpURLConnection rmonitor1 = ( HttpURLConnection ) new URL( monitor1 ).openConnection();

String bg="";
SimpleDateFormat time_formatter = new SimpleDateFormat("dd-MM-yyyy::HH:mm");
String current_time_str = time_formatter.format(System.currentTimeMillis());
out.print("<center/><h3>Current Time: "+current_time_str+"</h3>");
out.print("<table align=center border=1>");
out.print("<tr><th>APPLICATION</th><th>URL</th><th>STATUS</th></tr>");

try{
out.print("<tr><td>My Application Name</td>");
out.print("<td>"+monitor1+"</td>");
if(rmonitor1.getResponseCode() == 200){bg="#66ccff";}else{bg="#ff6600";}
out.print("<td bgcolor="+bg+">"+rmonitor1.getResponseCode()+"</td></tr>");
} catch (Exception e) {
        out.print("<td bgcolor=#ff6600>Connection Failed</td>");
}

%>
</body>
</html>
If your monitoring server requires proxy authentication, you can simply add following code for Proxy Authentication
System.getProperties().put("http.proxyHost", "proxyHost.com");
System.getProperties().put("http.proxyPort", "9090");
System.setProperty("https.proxyUser", "Proxy_username");
System.setProperty("https.proxyPassword", "Proxy_password");
Authenticator.setDefault(new Authenticator() {
    @Override
    protected PasswordAuthentication getPasswordAuthentication() {
        if (getRequestorType() == RequestorType.PROXY) {
            String prot = getRequestingProtocol().toLowerCase();
            String host = System.getProperty(prot + ".proxyHost", "");
            String port = System.getProperty(prot + ".proxyPort", "80");
            String user = System.getProperty(prot + ".proxyUser", "");
            String password = System.getProperty(prot + ".proxyPassword", "");
            if (getRequestingHost().equalsIgnoreCase(host)) {
                if (Integer.parseInt(port) == getRequestingPort()) {
                    return new PasswordAuthentication(user, password.toCharArray());
                }
            }
        }
        return null;
    }
});
Any suggestions or improvments to this code are welcome.
step-by-step: Encrypt Data Source Passwords in JBoss EAP6
It’s always a risk if you are storing plain-text passwords on the file system. A good system administratin practice is to make sure that passwords are always stored in encrypted form. By default JBoss EAP6 data source passwords are stored in plaintext inside standalone.xml/domain.xml.JBoss EAP6 uses picketbox security implementation for encrypting data source passwords.
In this post we will see step-by-step process to Encrypt Data Source Passwords in JBoss EAP6.
STEP1: Download the required packages for Installing.
Click here to download JBoss EAP6.4
Click here to download Mysql connector Jar
Click here to download JDK-1.8
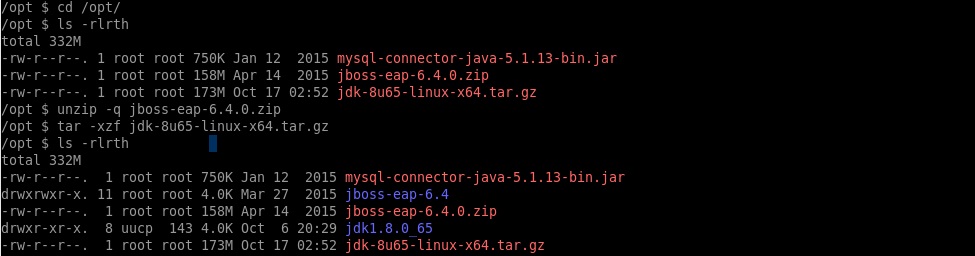
I have extracted all the packages under /opt/ as shown below.
Now once the installation is done, let’s move to configuring data sources.
STEP2: Installing MySQL Driver & configuring Data Source
For installing MySql driver follow the below steps as shown below.
cd /opt/
mkdir -p /opt/jboss-eap-6.4/modules/com/mysql/main/
cp -rp mysql-connector-java-5.1.13-bin.jar /opt/jboss-eap-6.4/modules/com/mysql/main/
Define module.xml inside /opt/jboss-eap-6.4/modules/com/mysql/main/ with following content
vi /opt/jboss-eap-6.4/modules/com/mysql/main/module.xml
<?xml version="1.0" encoding="UTF-8"?>
<module xmlns="urn:jboss:module:1.0" name="com.mysql">
	<resources>
      <resource-root path="mysql-connector-java-5.1.13-bin.jar"/>
    </resources>
    <dependencies>
      <module name="javax.api"/>
    </dependencies>
</module>
STEP3: Generate Encrypted Password using PicketBox & Configure Data Source.
Now we need to generate the encrypted password by using PicketBox class. In this step we will be supplying the DB user password which is used to connect to database. In my case, DB password is “SecretPass”.
Execute the below steps now
export JBOSS_HOME=/opt/jboss-eap-6.4
export CLASSPATH=${JBOSS_HOME}/modules/system/layers/base/org/picketbox/main/picketbox-4.1.1.Final-redhat-1.jar:${JBOSS_HOME}/modules/system/layers/base/org/jboss/logging/main/jboss-logging-3.1.4.GA-redhat-2.jar:$CLASSPATH
java  org.picketbox.datasource.security.SecureIdentityLoginModule SecretPass
Encoded password: 13e0362237c93a9cda89f5b3da271521
Now we can configure the MySQL DataSource in standalone.xml as shown below
<datasource jndi-name="java:/testDB" pool-name="MySqlDS_Pool" enabled="true" jta="false" use-ccm="false">
                <connection-url>
                  jdbc:mysql://localhost:3306/testDB
                </connection-url>
                <driver-class>
                  com.mysql.jdbc.Driver
                </driver-class>
                <driver>
                     mysql
                 </driver>
               <security>
                 <security-domain>
                   encrypted-ds
                 </security-domain>
               </security>
</datasource>
                <drivers>
  <driver name="mysql" module="com.mysql"/>
  <driver name="h2" module="com.h2database.h2">
<xa-datasource-class>org.h2.jdbcx.JdbcDataSource</xa-datasource-class></driver>
                </drivers>
Next step is to Locate the Subsystem “urn:jboss:domain:security:1.2” & add the security-domain inside that.
<security-domain name="encrypted-ds" cache-type="default">
 <authentication>
 <login-module code="org.picketbox.datasource.security.SecureIdentityLoginModule" flag=
"required">
 <module-option name="username" value="dbUserOne"/>
 <module-option name="password" value="13e0362237c93a9cda89f5b3da271521"/>
 <module-option name="managedConnectionFactoryName" value="jboss.jca:service=LocalTxCM,
name=MySqlDS_Pool"/>
 </login-module>
 </authentication>
 </security-domain>
Once all the above steps are completed Start JBoss EAP6 using standalone.sh script located inside /opt/jboss-eap-6.4/bin/ & monitor the Log.
cd /opt/jboss-eap-6.4/bin/
./standalone.sh
IF your configuration is correct, You should see the below output in JBoss logs which indicates that the MySQL Data Source was registered without any issues
02:55:21,486 INFO [org.jboss.as.connector.subsystems.datasources] (MSC service thread 1-1) JBAS010400: Bound data source [java:/testDB]
9 steps to optimize your nginx web server
Google uses it’s Page speed ranking algorithm to rank website listings. A fast website is always important if you want your users to visit your website again. In this post, I am going to discuss on 9 steps to optimize your nginx web server
STEP1: Keep the number of worker processes to be same as number of processor cores on the server.
The worker_processes directive tells VM as to how many workers should be launched when nginx starts up.
A recommened setting is to keep this number to be same as number of CPU cores on the VM.
You can calculate the number of CPU cores on your server using below command
grep processor /proc/cpuinfo | wc -l
We should also configure worker_connections directive properly, This value determines how many clients can be served by nginx simultaneously.
The default value is 768. The capacity of your nginx server can be determined by multiplying worker_processes with worker_connections.
vi /etc/nginx/nginx.conf
worker_processes 2;
worker_connections 1024;
For a 2-core processor with above configuration, Nginx can server 2048 concurrent connections.
STEP2: Optimize gzip compression for static contents
Gzip compression is the most common optimization parameter. This parameter can save your server’s network bandwidth utilization & speed up response time.
When gzip compression is enabled for static resources, Nginx will compress them & transfers. The client browser then decompresses them & renders the resource.
Following is the basic gzip compression configuration from nginx.conf
gzip on;
gzip_comp_level 2;
gzip_min_length 1000;
gzip_proxied expired no-cache no-store private auth;
gzip_types text/plain application/x-javascript text/xml text/css application/xml;
STEP3: Leverage browser caching to reduce unnecessary server load
Another important parameter which greatly contributes to the performance of your website.
If your static assets like css, images & js files don’t change frequently, it’s possible to cache them in client’s browser.
This will save the bandwidh & increase performance.
Following setting can be placed in your “server” block of your virtual host
location ~* .(jpg|jpeg|png|gif|ico|css|js)$ {
expires 365d;
}
STEP4: Integrate with Pagespeed module for better performance
An open source module for nginx/apache ships with latest Web optimization features.
For installing latest version of this module, nginx needs to be compiled with it’s latest package.
Click here to learn How to Build ngx_pagespeed from source.
STEP5: Enable keep-alive connections
We should configure keepalive_timeouts value to be a minimum. The recommended value is between 10 to 15.
This value determines how long the worker connection is kept alive on the client browser so that all the new client requests with be served through this connection.
Modify nginx.conf & put this value inside “http” block
keepalive_timeout 15;
STEP6: Enable shared session cache when on HTTPS
When nginx is on HTTPS, SSL Handshake is the most CPU-Intensive operation.
There are two ways to minimize the number of these operations per client:
- By enabling keepalive connections to send several requests via one connection
- Reuse SSL session parameters to avoid SSL handshakes for parallel and subsequent connections
To enable this, following configuration needs to be placed in “http” block inside nginx.conf
ssl_session_cache shared:SSL:10m;
ssl_session_timeout 10m;
Refer this guide for more details http://nginx.org/en/docs/http/configuring_https_servers.html
STEP7: Implement tmpfs file system for Cache directory.
A RAM directory/folder is always much faster than a directory based on normal hard disk, but it can lost all data when you reboot the server,
so the ideal is always to use this RAM directory to store cache files, that can easily re-created after the reboot.
Follow the below steps to enable tmpfs file system.
In this example, i have configured a WordPress plugin to cache the website files under /var/www/html/wp-content/cache
1. Configure a tmpfs partition on a new Directory.
mount -t tmpfs -o size=2G tmpfs /var/www/html/wp-content/cache
2. To make this partition survive after reboot, Add following entry to /etc/fstab file
tmpfs /var/www/nginxtips.com/wp-content/cache tmpfs defaults,size=2G 0 0
Now test your website & you should see faster response times after a few hits.
STEP8: Have a CDN to cache static assets
Cloudflare has a very intelligent caching system & CDN. I would recommend this if your website has users worldwide.
Cloudflare also has threat protection system for your website, which can be enabled on a single click from their control panel.
Click here to learn more about Cloudflare.
STEP9: Serve static assets using seperate domain
Having static assets on a seperate subdomain will help in increasing the load time of your site.
Thoughts or Suggestions?.
