In this Article I will show you how to Connect SquirrelSQL with HiveServer2.
Apache Hive is a Data warehouse software using which we can Read/Write & manage large datasets residing on distributed Storage systems like Hadoop using SQL Language.
HiveServer2 (HS2) is a server interface that enables remote clients to execute queries against Hive and retrieve the results. By default Hive Server runs on port 10000 & various clients can connect to it & manage the Data over there.
Firstly we need to Download the latest version of Hive Server and install it on a server if you do not have already. Document to install HiveServer2 is avaiable Here
I have installed my setup of HiveServer2 on a CentOS 6.7 machine on port 10000
I am using Hadoop 2.7.1 HDFS as distributed storage for Hive & Metadata gets stored in Derby database.
Connecting through SquirrelSQL 3.7
Step1:
Your First step will be downloading SquirrelSQL client, Which can be downloaded from Here http://squirrel-sql.sourceforge.net/#installation
You can simply extract the downloaded Package & run it by double clicking or Executing the executable JAR file squirrel-sql.jar
NOTE: Please note that SquirrelSQL runs requires Java on your machine, Make sure you have installed JRE on your PC.
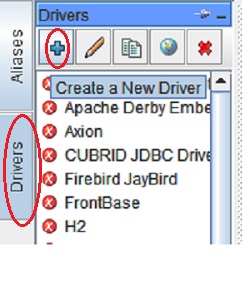
Step2:
In this step we will Configure a Driver for Hive Server. To Configure a new driver Click on the Drivers Tab on the Left sidebar & Plus Sign as shown below.
Now we need to pass various values like Alias Name, Example URL which will be the default URL for every new Connection.
Name: This value can be any String, You can name it as “Hive”
Example URL: Provide value as jdbc:hive2://REMOTE_SERVER:10000/db_name where db_name is the database which you created or you can simply connect to default database. Leave website URL as Empty.
Now click on the tab “Extra Class Path” & add all the JAR files which are shown below.
These JAR files needs to be downloaded from the Hive server’s lib directory.
Once you have added the JAR files, Select all JAR files & click on “List Drivers” button. Clicking on this button should display the below class name “org.apache.hive.jdbc.HiveDriver” after “Class Name” label.
Verify & click on “OK” button.
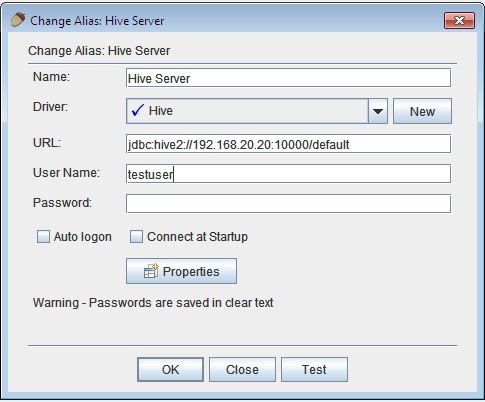
Step3:
In this step, We will create an Alias for Connecting with Hive server, You need to configure the Alias settings as shown below.

If your Hive Server is connected to Hadoop HDFS storage, Make sure to provide required username in the username field.
Once all the settings are Saved, Verify if the connection is working properly by clicking on “Test” button
If you see “Connection Successful” message, You’re done.
Feel free to Comment here if you face any issues during the setup.


