How to reset your Lost VestaCP admin password

In this post I will show you how to reset your Lost VestaCP admin password.

There are two methods to reset password for “admin” user in VestaCP. “admin” user in VestaCP is registered as a SSH user and all other VestaCP accounts are registered in the same way hence it makes easy for you to reset the admin password if you have knowledge of basic Linux commands.

METHOD1:
The following command is recommended by VestaCP for resetting admin password. Login to your server via SSH & execute the one liner as shown below

v-change-user-password admin secret

Here “secret” is the new password we have set, You can provide a stronger password here.

METHOD2:
This method uses standard Linux passwd command to reset the password. Just execute the passwd command & provide your secure password at the Prompt as shown below & you’re done.

admin-vesta-reset

Step-by-Step: Connecting to Apache HiveServer2 from SquirrelSQL

In this Article I will show you how to Connect SquirrelSQL with HiveServer2.

Apache Hive is a Data warehouse software using which we can Read/Write & manage large datasets residing on distributed Storage systems like Hadoop using SQL Language.

HiveServer2 (HS2) is a server interface that enables remote clients to execute queries against Hive and retrieve the results. By default Hive Server runs on port 10000 & various clients can connect to it & manage the Data over there.

Firstly we need to Download the latest version of Hive Server and install it on a server if you do not have already. Document to install HiveServer2 is avaiable Here

I have installed my setup of HiveServer2 on a CentOS 6.7 machine on port 10000
I am using Hadoop 2.7.1 HDFS as distributed storage for Hive & Metadata gets stored in Derby database.

Connecting through SquirrelSQL 3.7

Step1:
Your First step will be downloading SquirrelSQL client, Which can be downloaded from Here http://squirrel-sql.sourceforge.net/#installation
You can simply extract the downloaded Package & run it by double clicking or Executing the executable JAR file squirrel-sql.jar

NOTE: Please note that SquirrelSQL runs requires Java on your machine, Make sure you have installed JRE on your PC.

Step2:
In this step we will Configure a Driver for Hive Server. To Configure a new driver Click on the Drivers Tab on the Left sidebar & Plus Sign as shown below.

squirel-sql-create-driver
Now we need to pass various values like Alias Name, Example URL which will be the default URL for every new Connection.
Name: This value can be any String, You can name it as “Hive”
Example URL: Provide value as jdbc:hive2://REMOTE_SERVER:10000/db_name where db_name is the database which you created or you can simply connect to default database. Leave website URL as Empty.

Now click on the tab “Extra Class Path” & add all the JAR files which are shown below.

hive-create-connection
These JAR files needs to be downloaded from the Hive server’s lib directory.
Once you have added the JAR files, Select all JAR files & click on “List Drivers” button. Clicking on this button should display the below class name “org.apache.hive.jdbc.HiveDriver” after “Class Name” label.
Verify & click on “OK” button.

Step3:
In this step, We will create an Alias for Connecting with Hive server, You need to configure the Alias settings as shown below.

hive-squirelsql

If your Hive Server is connected to Hadoop HDFS storage, Make sure to provide required username in the username field.

Once all the settings are Saved, Verify if the connection is working properly by clicking on “Test” button
If you see “Connection Successful” message, You’re done.

Feel free to Comment here if you face any issues during the setup.

step-by-step: Encrypt Data Source Passwords in JBoss EAP6

It’s always a risk if you are storing plain-text passwords on the file system. A good system administratin practice is to make sure that passwords are always stored in encrypted form. By default JBoss EAP6 data source passwords are stored in plaintext inside standalone.xml/domain.xml.JBoss EAP6 uses picketbox security implementation for encrypting data source passwords.

In this post we will see step-by-step process to Encrypt Data Source Passwords in JBoss EAP6.

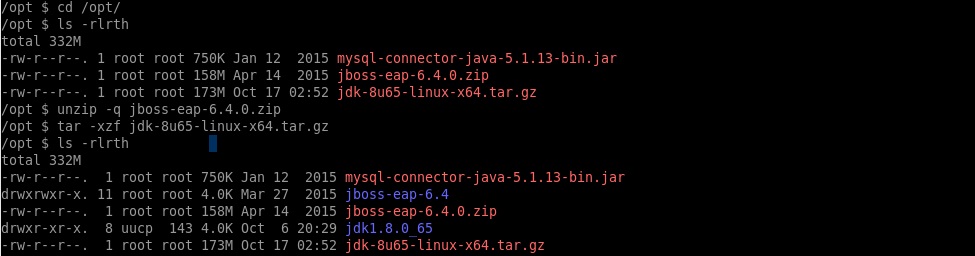
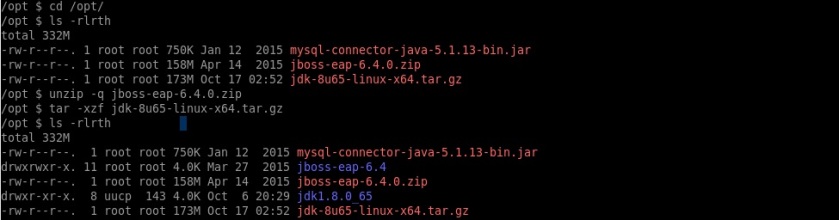
STEP1: Download the required packages for Installing. 

Click here to download JBoss EAP6.4
Click here to download Mysql connector Jar
Click here to download JDK-1.8

I have extracted all the packages under /opt/ as shown below.

jboss2020

Now once the installation is done, let’s move to configuring data sources.

STEP2: Installing MySQL Driver & configuring Data Source

For installing MySql driver follow the below steps as shown below.

cd /opt/
mkdir -p /opt/jboss-eap-6.4/modules/com/mysql/main/
cp -rp mysql-connector-java-5.1.13-bin.jar /opt/jboss-eap-6.4/modules/com/mysql/main/

Define module.xml inside /opt/jboss-eap-6.4/modules/com/mysql/main/ with following content

vi /opt/jboss-eap-6.4/modules/com/mysql/main/module.xml


<?xml version="1.0" encoding="UTF-8"?>
<module xmlns="urn:jboss:module:1.0" name="com.mysql">
	<resources>
      <resource-root path="mysql-connector-java-5.1.13-bin.jar"/>
    </resources>
    <dependencies>
      <module name="javax.api"/>
    </dependencies>
</module>

STEP3: Generate Encrypted Password using PicketBox & Configure Data Source.
Now we need to generate the encrypted password by using PicketBox class. In this step we will be supplying the DB user password which is used to connect to database. In my case, DB password is “SecretPass”.

Execute the below steps now

export JBOSS_HOME=/opt/jboss-eap-6.4
export CLASSPATH=${JBOSS_HOME}/modules/system/layers/base/org/picketbox/main/picketbox-4.1.1.Final-redhat-1.jar:${JBOSS_HOME}/modules/system/layers/base/org/jboss/logging/main/jboss-logging-3.1.4.GA-redhat-2.jar:$CLASSPATH
java  org.picketbox.datasource.security.SecureIdentityLoginModule SecretPass
Encoded password: 13e0362237c93a9cda89f5b3da271521

Now we can configure the MySQL DataSource in standalone.xml as shown below

<datasource jndi-name="java:/testDB" pool-name="MySqlDS_Pool" enabled="true" jta="false" use-ccm="false">
                <connection-url>
                  jdbc:mysql://localhost:3306/testDB
                </connection-url>
                <driver-class>
                  com.mysql.jdbc.Driver
                </driver-class>
                <driver>
                     mysql
                 </driver>
               <security>
                 <security-domain>
                   encrypted-ds                                                            
                 </security-domain>
               </security>                                                              
</datasource>
                <drivers>
  <driver name="mysql" module="com.mysql"/>
  <driver name="h2" module="com.h2database.h2">
<xa-datasource-class>org.h2.jdbcx.JdbcDataSource</xa-datasource-class></driver>
                </drivers>

Next step is to Locate the Subsystem “urn:jboss:domain:security:1.2” & add the security-domain inside that.

<security-domain name="encrypted-ds" cache-type="default">
 <authentication>
 <login-module code="org.picketbox.datasource.security.SecureIdentityLoginModule" flag=
"required">
 <module-option name="username" value="dbUserOne"/>
 <module-option name="password" value="13e0362237c93a9cda89f5b3da271521"/>
 <module-option name="managedConnectionFactoryName" value="jboss.jca:service=LocalTxCM,
name=MySqlDS_Pool"/>
 </login-module>
 </authentication>
 </security-domain>

Once all the above steps are completed Start JBoss EAP6 using standalone.sh script located inside /opt/jboss-eap-6.4/bin/ & monitor the Log.

cd /opt/jboss-eap-6.4/bin/
./standalone.sh

IF your configuration is correct, You should see the below output in JBoss logs which indicates that the MySQL Data Source was registered without any issues

02:55:21,486 INFO  [org.jboss.as.connector.subsystems.datasources] (MSC service thread 1-1) JBAS010400: Bound data source [java:/testDB]


Quick Command to Clear Email Queue in Exim Server

I have occasionally experienced SPAM emails on  some Linux servers running Exim & observed that there were huge number of emails stuck in the Email Queue.

I use the following quick command to remove all the Emails from the Queue. This command needs to be executed as root user.

exim -bp | exiqgrep -i | xargs exim -Mrm

We have to wait for some time until this command clears the whole Queue, It might take few minutes depending on the Server specs you have.

FTP Trick – Using wget to Download a FTP Directory Recursively

Hello Guys,


If you are stuck in downloading an FTP directory recursively, You can use the following FTP Trick Using wget to Download FTP Directory Recursively. It’s Very Simple to use.

You would need to do this via SSH console. Just login to your SSH server and then execute the below wget command.

wget -r --user username --password password --passive-ftp ftp://xx.xx.xx.xx//home/XYZ/public_html/

Where xx.xx.xx.xx is the IP address of your FTP server and you have to provide the username/passwords as the arguments as shown above.

Some FTP servers allow only passive-mode transfers, To enable the passive mode we should use –passive-ftp flag


Hope this helps. If you have other methods, you can post them in the below comment Box :)

How to Install and Configure OBTVSE2 on Ubuntu

OBTVSE2 is a clean and simple markdown blogging platform on Rails. Installing OBTVS2 on Ubuntu is quite easier if you have basic Linux Admin skills.

I followed the below steps to setup OBTVSE2 on Ubuntu Server

1. We need to create a Normal SSH user with sudo priviliges called obtv using the below commands and login to that user shell

#useradd -m obtv -s /bin/bash -g sudo
--Assign a password to this user
#passwd obtv
Login as obtv user now and you should be under /home/obtv directory

2. OBTVSE2 requires Ruby, So We need to setup the Ruby environment , Follow the steps below


#curl -L https://get.rvm.io | bash -s stable --rails
#source ~/.rvm/scripts/rvm
#rvm install ruby-2.0.0-p481
#rails new Sites

This will setup the ruby project under /home/obtv/Sites/

3. Now we will download the obtvse2 inside “Sites” folder

#cd Sites/
#git clone git://github.com/natew/obtvse2.git
#cd obtvse2
#gem install debugger
#bundle install
#rake db:migrate

4. obtvse2 requires a runtime server, For this we will install a node.js server

#apt-get install libpq-dev nodejs

5. Now we will start the OBTVSE2 application on some port say 3000. We will start this server inside a screen so it will be running even if you logout
From root user login, create a screen

#screen -S obtvse2-blog

Now under the screen start the application on port 3000 with user obtv

Edit /home/obtv/Sites/obtvse2/config/info.yml to fill in your personal and site information.

#su - obtv
#cd Sites/obtvse2
#bundle exec rails s

This will start your obtvse2 application on port 3000
After executing above commands, Press ctrl+D to leave the screen active and exit.

6. Now we have to Configure Apache so that your site blog.domain.com connects to the back-end OBTVSE2 application.

Create a virtual host and configuration should look like below

ServerName blog.domain.com
ServerAdmin webmaster@localhost
DocumentRoot /var/www/html
ProxyRequests Off
ProxyPreserveHost On
ProxyPass / http://localhost:3000/
ProxyPassReverse / http://localhost:3000/
&lt;Directory /var/www/html&gt;
Options -Indexes
DirectoryIndex index.html index.php
AllowOverride All

ErrorLog ${APACHE_LOG_DIR}/error.log
CustomLog ${APACHE_LOG_DIR}/access.log combined

7. After this just enable this Apache virtual host, reload your apache server and access the obtvse2 application at http://blog.domain.com

If you have any difficulty with the setup, Feel free to ask.

Useful JVM Parameters for Troubleshooting Adobe CQ5 performance

We often face the performance issues on our CQ5 servers which may be related to high memory or CPU utilization issues.

Below are some Useful JVM Parameters for debugging Adobe CQ5 performance.

-XX:+HeapDumpOnOutOfMemoryError — write an heapdump if the JVM runs out of heap space
    -XX:+HeapDumpOnCtrlBreak — on windows create an heapdump when pressing ctrl+break
    -verbose:gc — verbose garbage collection logging
    -XX:+PrintGCTimeStamps — print timestamps in the GC log
    -XX:+PrintGCDetails — even more GC information
    -Xloggc:gc.log — write the GC logs to this file and not to stdout
    -XX:+UseGCLogFileRoatation (since Java 6u32 or Java 7u2) — enable GC log rotation
    -XX:+NumberOfGCLogFiles=10 (since Java 6u32 or Java 7u2) — and keep 10 versions of that GC log