In this article i will show you how to install Comodo’s PositiveSSL certificate on VestaCP.
VestaCP which is a free to use & open source control panel and it’s becoming popular due to it’s ease of use & nice features. Unlike webmin, vestaCP provides you an easy web GUI to install SSL certificates for websites as it’s there in Cpanel.
The SSL certificate can be bought at cheap price from https://www.ssls.com/ssl-certificates/comodo-positivessl
SSL certificate providers require a valid CSR file to issue the Certificate.You can use this online tool https://csrgenerator.com/ to generate the CSR & private key files.

Save the generated CSR & private key in seperate files as we need this during installation.
STEP 1: Open your browser & login to your Vesta Control Panel using https://IP-ADDRESS:8083/

STEP 2: Now you will see multiple tabs. Click on Tab “WEB” & after clicking on this you will see a plus symbol icon
Clicking on this icon will open up a page to add your domain details.

STEP 3: Here we will be providing details of our domain name & SSL certificate details.
Domain: Provide the name of your domain
IP Address: Select the correct IP address of your server
DNS Support: Check this option if you are managing DNS records on VestaCP
Mail Support: Check this option if you are managing email accounts on VestaCP
clicking on “ADVANCED OPTIONS” will open up settings where we can configure SSL, FTP & some other features
Alias: Provide any additional domain names for this site. Example : http://www.serverliving.com
Proxy Support: This option should be checked
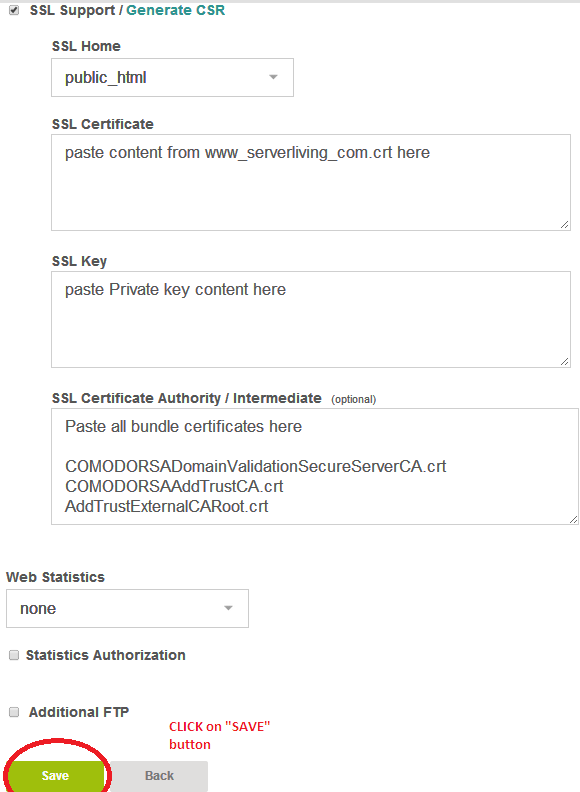
SSL Support: Enable this option & install your SSL certificate as below
SSL Home: You can leave it as default public_html or it needs to be changed to public_shtml if you want to serve HTTPS site from this directory.
SSL Certificate: Paste the contents from www_serverliving_com.crt
SSL Key: Paste the private key which you generated using https://csrgenerator.com/
SSL Certificate Authority/Intermediate:
Combine the following certificates into one file using text editor & paste the contents in this section.
(Maintain the correct order as shown below)
COMODORSADomainValidationSecureServerCA.crt
COMODORSAAddTrustCA.crt
AddTrustExternalCARoot.crt
Once all the entries are added. Save the configuration by clicking “SAVE” button.
If the installation is successfull, you should see message saying “Domain has been added successfully”
Let me know if you have any trouble setting up SSL.


