3 steps to connect Jconsole to remote Tomcat7 from Windows

In this post i will show you 3 steps to connect Jconsole to remote Tomcat7 from Windows-7.

Jconsole tool is a JMX ready GUI tool for monitoring a Java virtual machine. Using this tool, you can monitor real-time status of your application server threads, memory,cpu,MBeans, active sessions etc.

My Local machine environment is below

  • Local JDK -> JDK 1.7
  • Operating System -> Windows7 64-bit

My Remote server details

  • Remote JDK -> JDK 1.7
  • Operating system -> Linux
  • Application server -> Tomcat-7.0.63

STEP1: Download & Install JDK 1.7 from Oracle website onto your Windows desktop

Here is the link to download Click Here


STEP2: Enable JMX access on your remote Tomcat server

To enable JMX access, you need to edit catalina.sh which can be found inside $CATALINA_HOME/bin/ directory.


Edit catalina.sh & append following JVM parameters to JAVA_OPTS. On my server, this entry was located in line #98


JAVA_OPTS="${JAVA_OPTS} -Xms2048M -Xmx2048M -Dcom.sun.management.jmxremote 
-Dcom.sun.management.jmxremote.port=9991 
-Dcom.sun.management.jmxremote.authenticate=false 
-Dcom.sun.management.jmxremote.ssl=false 
-Djava.rmi.server.hostname=20.20.20.20


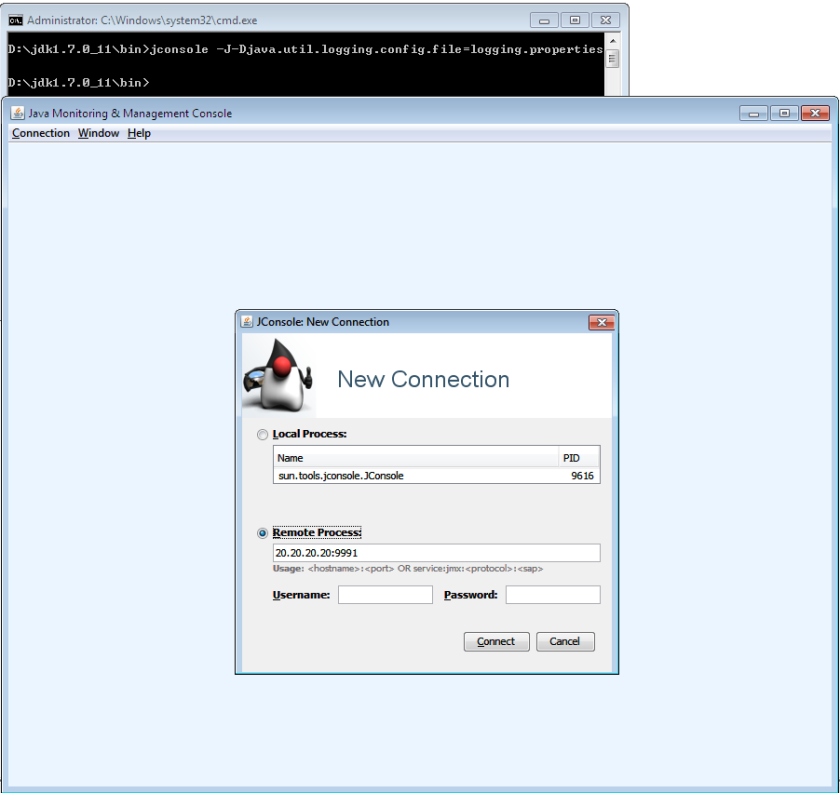
STEP3: Launch Jconsole on your Windows desktop from command prompt using below command.

jconsole -J-Djava.util.logging.config.file=logging.properties

If you want to enable logging for debugging purpose, you can enable it using below method.

my logging.properties looks like below

logging.properties
handlers = java.util.logging.ConsoleHandler
.level = INFO
java.util.logging.ConsoleHandler.level = FINEST
java.util.logging.ConsoleHandler.formatter = 
java.util.logging.SimpleFormatter
// Use FINER or FINEST for javax.management.remote.level - FINEST is
// very verbose...
javax.management.level = FINEST
javax.management.remote.level = FINER

Once everything is setup, You can start Jconsole & connect to your Tomcat JMX port as shown below.

jconsole-1


Understanding Apache log formats common and combined

Apache comes with four standard LogFormat directives which you can use define custom log files based on your requirement.
They are shown below.

LogFormat "%h %l %u %t "%r" %>s %b "%{Referer}i" "%{User-Agent}i"" combined
LogFormat "%h %l %u %t "%r" %>s %b" common
LogFormat "%{Referer}i -> %U" referer
LogFormat "%{User-agent}i" agent

As you can see above every LogFormat directive has some special name appended at the end – combined, common, referer & agent.

There special names are called as the nicknames for those Log formats. We can say them as an identifier for different logging formats.

For example, if you want to capture only referers for each HTTP request, You can configure a custom log which with a custom filename.
Like below

CustomLog logs/referer.log referer


Note that these nicknames cannot be used with ErrorLog directive.

Installing nginx-1.9.5 from source with HTTP/2 support

With the release of 1.9.5, nginx has added support for the awaited HTTP/2 protocol & it’s known that HTTP/2 has lots of performance enhancements to offer. Starting with nginx 1.9.5, SPDY module will be replaced by HTTP/2

It’s also important to know that 1.9.5 is currently an experimental version. Feel free to post if you are seeing any issues with this version.

Today i will show you the detailed steps on Installing nginx-1.9.5 from source with HTTP/2 support on a Linux server.
You need to login as root user to execute these steps.

STEP1: Install Dependencies

Since we are compiling nginx from source, we need to

yum -y install gcc pcre pcre-devel openssl openssl-devel

NOTE: Nginx http/2 module requires openssl 1.0.2 or latest version if you want to run website over HTTPS.

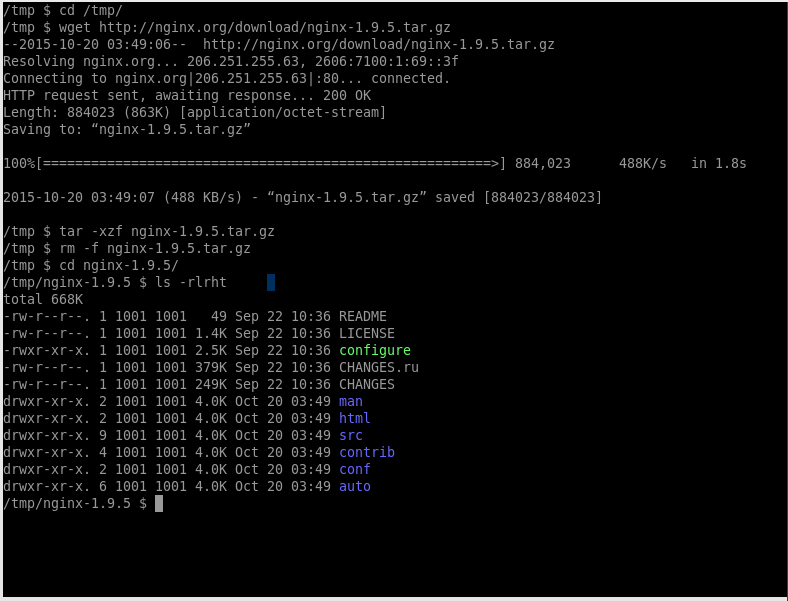
STEP2: Downlod the latest version of nginx & extract the archive.

cd /tmp/
wget http://nginx.org/download/nginx-1.9.5.tar.gz
tar -xzf nginx-1.9.5.tar.gz
cd nginx-1.9.5/

nginx-195

STEP3: Compile & install nginx from source.

As stated earlier, nginx will fail to compile if you try to enable SPDY module. You can see the following error.


spdy-disabled

Now let’s compile nginx from source.

./configure --with-http_v2_module --with-http_ssl_module
make
make install

Make sure to fix if you get any errors during compilation.

STEP4: Verify the Installation

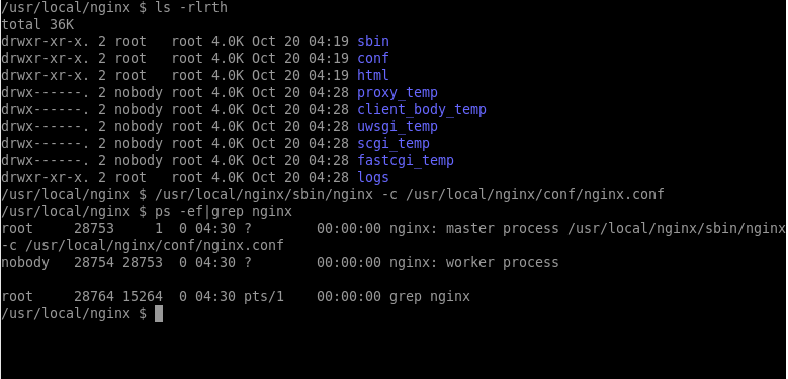
After successful compilation & installation, check the directory /usr/local/nginx/ which will have all the installed files.

nginx-startup

Once nginx is installed successfully, you can run it using the below command

/usr/local/nginx/sbin/nginx -c /usr/local/nginx/conf/nginx.conf

To test the scenario, Create a virtual host & add the directive to listen statement as shown below

server {
listen 80 http2;
......
}

or

server {
listen 443 http2;
......
}

Lastly, Test your web server for HTTP/2 support at https://www.h2check.org/

NOTE: Currently no browser supports HTTP/2 without HTTPS. This means that you are required to setup HTTP/2 over https only. Please refer this FAQ to know more

Configuring custom error pages in Tomcat

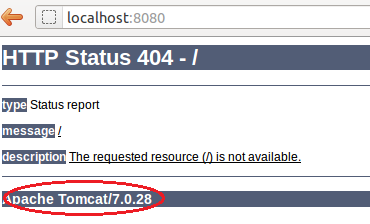
Since tomcat doesn’t come with user friendly messages when an error occurs. This situation can be handled by Configuring custom error pages in Tomcat.

Tomcat-error-404


The most common type of error messages are 404, 400 & 500 . As the tomcat’s default error pages expose the Version of tomcat, it’s important to hide the version information as part of security best practices.

Let’s get started with the configuration stuff now.
I have installed Tomcat under /opt so my CATALINA_HOME value is /opt/apache-tomcat-7.0.63/

STEP1: Tomcat Configuration

Edit /opt/apache-tomcat-7.0.63/conf/web.xml and add the following configuration just before </web-app>

<error-page>
<error-code>404</error-code>
<location>/404.html</location>
</error-page>

<error-page>
<error-code>500</error-code>
<location>/500.html</location>
</error-page>
<error-page>
<error-code>400</error-code>
<location>/400.html</location>
</error-page>


STEP2: Creating custom error pages.

I have deployed my application as ROOT, so i will place my 3 custom error html files under /opt/apache-tomcat-7.0.63/webapps/ROOT/
Now create 3 seperate html files called 404.html, 500.html & 400.html

touch 404.html 500.html 400.html

Now i will update these files with suitable error messages.

STEP3: Restarting Tomcat server

Once you restart tomcat server, try to access any non existing URL on the server & you should be able to see custom error messages as you created


7 Steps for Securing Apache web server

This article is for the people who have just setup Apache web server & wanted to secure it. I am going to tell you the 7 Steps for Securing Apache web server against most common types of attacks today.

I am executing these steps on an Ubuntu 14.04 LTS virtual server.


STEP1: Hide Apache Version information from HTTP response

It’s a risky option to show the version of your Apache web server to the visitor. If a hacker comes to know about any vulnerability with your server’s Apache version, chances are that your server can get compromised.

Following method is used to hide Apache version from response headers & signature.

Open /etc/apache2/conf-enabled/security.conf in an editor & modify the following Values to look like below

ServerTokens Prod
ServerSignature Off

STEP2: Disable HTTP methods TRACE & OPTIONS

Disabling OPTIONS & TRACE method is important from security perspective since they are expected to be used for getting Diagnostic information from your server. So For disabling there methods i will have following values in /etc/apache2/conf-enabled/security.conf


TraceEnable Off
RewriteEngine On
RewriteCond %{REQUEST_METHOD} ^OPTIONS
RewriteRule .* – [F]

Make sure that you have enabled mod_rewrite in order for the above rewrite rules to work properly.

STEP3: Restrict uploads directory for only certain file types

Suppose you have a directory “uploads” in the document root and there is a chance that attacker might use different techniques to upload malware code on this directory. To prevent this add the following rules to the virtual host configuration file.

RewriteCond %{REQUEST_URI} ^/uploads [NC]
RewriteCond %{REQUEST_URI} !.(jpe?g|png|gif)$ [NC]
RewriteRule .* - [F,L]

The above code will make sure that only file types allowed to be uploaded are jpg, jpeg, png & gif

STEP4: Mitigate DoS (Slowris) attacks

Since apache is a thread based web server, We need to make sure that it will not get affected by Slowiris DoS attack. Under this vulnerability, the attacker can send slow HTTP requests in huge numbers, thus causing a disruption to your Web server and apache may become unresponsive.

Following fix can be applied to Apache to avoid this attack. Make sure that you have mod_reqtimeout module installed an enabled in Apache.

<IfModule mod_reqtimeout.c>
  RequestReadTimeout header=20-40,MinRate=500 body=20,MinRate=500
</IfModule>

STEP5: Protecting against SQL injection attacks

SQL Injection has become a common threat to any website running a MySQL backed a web application. Preventing this is an important step in security. With the power of mod_rewrite & mod_security most of the SQL injection attacks can be prevented.

You can install mod_security & include all CORE rules provided by OWASP

Following are some handy rules using which you can avoid SQL injection attacks. You can place them either in virtual host file or .htaccess

RewriteCond %{QUERY_STRING} [a-zA-Z0-9_]=http:// [OR]
RewriteCond %{QUERY_STRING} [a-zA-Z0-9_]=(..//?)+ [OR]
RewriteCond %{QUERY_STRING} [a-zA-Z0-9_]=/([a-z0-9_.]//?)+ [NC,OR]
RewriteCond %{QUERY_STRING} =PHP[0-9a-f]{8}-[0-9a-f]{4}-[0-9a-f]{4}-[0-9a-f]{4}-[0-9a-f]{12} [NC,OR]
RewriteCond %{QUERY_STRING} (../|..) [OR]
RewriteCond %{QUERY_STRING} ftp: [NC,OR]
RewriteCond %{QUERY_STRING} http: [NC,OR]
RewriteCond %{QUERY_STRING} https: [NC,OR]
RewriteCond %{QUERY_STRING} =|w| [NC,OR]
RewriteCond %{QUERY_STRING} ^(.*)/self/(.*)$ [NC,OR]
RewriteCond %{QUERY_STRING} ^(.*)cPath=http://(.*)$ [NC,OR]
RewriteCond %{QUERY_STRING} (<|%3C).*script.*(>|%3E) [NC,OR]
RewriteCond %{QUERY_STRING} (<|%3C)([^s]*s)+cript.*(>|%3E) [NC,OR]
RewriteCond %{QUERY_STRING} (<|%3C).*iframe.*(>|%3E) [NC,OR]
RewriteCond %{QUERY_STRING} (<|%3C)([^i]*i)+frame.*(>|%3E) [NC,OR]
RewriteCond %{QUERY_STRING} base64_encode.*(.*) [NC,OR]
RewriteCond %{QUERY_STRING} base64_(en|de)code[^(]*([^)]*) [NC,OR]
RewriteCond %{QUERY_STRING} GLOBALS(=|[|%[0-9A-Z]{0,2}) [OR]
RewriteCond %{QUERY_STRING} _REQUEST(=|[|%[0-9A-Z]{0,2}) [OR]
RewriteCond %{QUERY_STRING} ^.*([|]|(|)|<|>).* [NC,OR]
RewriteCond %{QUERY_STRING} (NULL|OUTFILE|LOAD_FILE) [OR]
RewriteCond %{QUERY_STRING} (./|../|.../)+(motd|etc|bin) [NC,OR]
RewriteCond %{QUERY_STRING} (localhost|loopback|127.0.0.1) [NC,OR]
RewriteCond %{QUERY_STRING} (<|>|'|%0A|%0D|%27|%3C|%3E|%00) [NC,OR]
RewriteCond %{QUERY_STRING} concat[^(]*( [NC,OR]
RewriteCond %{QUERY_STRING} union([^s]*s)+elect [NC,OR]
RewriteCond %{QUERY_STRING} union([^a]*a)+ll([^s]*s)+elect [NC,OR]
RewriteCond %{QUERY_STRING} (;|<|>|'|"|)|%0A|%0D|%22|%27|%3C|%3E|%00).*(/*|union|select|insert|drop|delete|update|cast|create|char|convert|alter|declare|order|script|set|md5|benchmark|encode) [NC,OR]
RewriteCond %{QUERY_STRING} (sp_executesql) [NC]
RewriteRule ^(.*)$ - [F,L]

STEP6: Have your website only talk on HTTPS

This step is very important if you are running a transaction based website like Ecommerce, Payment etc. In future google will be ranking the sites up which are serving content over HTTPS.

Following is the configuration which you can use while setting up SSL certificate for your site.

Following rule enforces all requests to be served on HTTPS. Please it in .htaccess file.

Rewritengine On
RewriteCond %{SERVER_PORT} 80
RewriteRule ^(.*)$ https://%{HTTP_HOST}/$1 [R=301,L]

Place the following rules in apache’s virtual host file.

SSLCompression off 
SSLProtocol All -SSLv2 -SSLv3 -TLSv1
SSLHonorCipherOrder On
SSLCipherSuite ECDHE-RSA-AES128-GCM-SHA384:ECDHE-RSA-AES128-GCM-SHA128:DHE-RSA-AES128-GCM-SHA384:DHE-RSA-AES128-GCM-SHA128:ECDHE-RSA-AES128-SHA384:ECDHE-RSA-AES128-SHA128:ECDHE-RSA-AES128-SHA:ECDHE-RSA-AES128-SHA:DHE-RSA-AES128-SHA128:DHE-RSA-AES128-SHA128:DHE-RSA-AES128-SHA:DHE-RSA-AES128-SHA:ECDHE-RSA-DES-CBC3-SHA:EDH-RSA-DES-CBC3-SHA:AES128-GCM-SHA384:AES128-GCM-SHA128:AES128-SHA128:AES128-SHA128:AES128-SHA:AES128-SHA:DES-CBC3-SHA:HIGH:!aNULL:!eNULL:!EXPORT:!DES:!MD5:!PSK:!RC4
Header always set Strict-Transport-Security "max-age=63072000; includeSubDomains"

STEP7: Protect your application against DDoS & brute force attacks.

DDoS attacks are severe headache & they can cause a huge downtime on your websites. DDoS attack is done by sending continuous heavy number of requests to your web server so that your Apache is kept busy and hence it will because unresponsive.

There are various firewalls & solutions available for securing apache against DDoS, I would recommend using either Cloudflare CDN or fail2ban firewall.

fail2ban runs on the same machine where apache is running and it will examine requests from specific IP & drops their connections once the threshold is reached. This threshold value can be configured.

To use CloudFlare CDN, you are required to map your website to name servers provided by cloudflare.


Any Thoughts?
 

Configuring tomcat 7 to run with custom JSESSIONID

As you might be aware, Tomcat’s default session cookie name is JSESSIONID. In some situations you will  be required to run a Tomcat instance with a different JSESSIONID cookies for all applications .

We had a similar requirement, we had 3 web applications running on 3 different context roots on same tomcat server & those applications were running on Single Sign on basis. While testing we have observed that the application was not maintaining the session properly & user was always redirected back to Login screen.

On some debugging we realized that we need to modify one of the applications JSESSIONID cookie name.

Here i will show you how we configured tomcat to run with custom JSESSIONID cookie name.


Open your tomcat’s server.xml (apache-tomcat-7.0.63/conf/server.xml) file & edit like below.


 <Engine name="portal" defaultHost="localhost">
        <Host name="localhost"  appBase="/opt/myapp/portal/webapp"
              unpackWARs="true" autoDeploy="true">

                <Context path="/" sessionCookieName="JSESSIONID_PORTAL"></Context>

            <Valve className="org.apache.catalina.valves.AccessLogValve" directory="logs"
                   prefix="portal_access_log." suffix=".txt"
                   pattern="%h %l %u %t &quot;%r&quot; %s %b" />

        </Host>
    </Engine>

Here we created a seperate Engine for our application which was running on / context root & added the attribute sessionCookieName.

After doing these changes we had restarted the tomcat server and the application session was then working perfectly.

Hope this helps someone.


3 steps to modify default port of VestaCP

Today we will see How to modify default port of VestaCP through SSH console. By default VestaCP runs on HTTP port 8083.

Since VestaCP doesn’t have any specific Captcha feature on it’s login page, As a security best practice it’s recommended to change the default port of VestaCP to a non-standard one.

VestaCP runs as a HTTP service on Nginx web server, If you are familiar with SSH & any editors like vi, vim,nano etc, you can easily modify it.

Following are the steps required to change the VestaCP port.


STEP 1: Login to your server via SSH & open Vesta’s nginx configuration file. I am using vi editor for this.

vi /usr/local/vesta/nginx/conf/nginx.conf

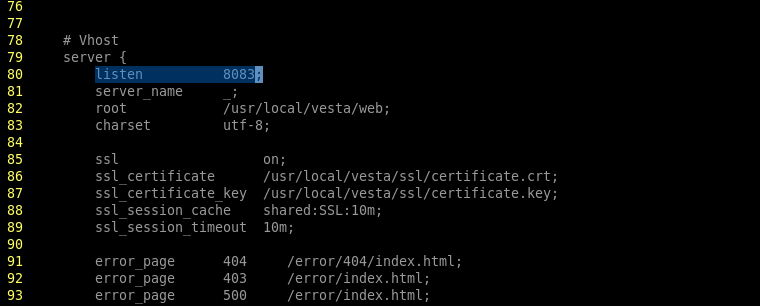
STEP 2:  Scroll down to Line number 80 & locate the statement “listen”, as highlighed below.

11

replace the default port from 8083 to anything which can be harder to guess. Save the file & exit.

STEP 3: Finally restart the Vesta nginx server for changes to take effect. You need to also make sure that the new port is open in the Firewall.

12

Great!. Now you can access your VestaCP on a custom port by acessing https://IP:PORT/.

Let me know if you have any questions on this.


How to install Comodo SSL on VestaCP

In this article i will show you how to install Comodo’s PositiveSSL certificate on VestaCP.

VestaCP which is a free to use & open source control panel and it’s becoming popular due to it’s ease of use & nice features. Unlike webmin, vestaCP provides you an easy web GUI to install SSL certificates for websites as it’s there in Cpanel.

The SSL certificate can be bought at cheap price from https://www.ssls.com/ssl-certificates/comodo-positivessl


SSL certificate providers require a valid CSR file to issue the Certificate.You can use this online tool https://csrgenerator.com/ to generate the CSR & private key files.

13

Save the generated CSR & private key in seperate files as we need this during installation.


STEP 1: Open your browser & login to your Vesta Control Panel using https://IP-ADDRESS:8083/


1

STEP 2: Now you will see multiple tabs. Click on Tab “WEB” & after clicking on this you will see a plus symbol icon
Clicking on this icon will open up a page to add your domain details.

2

STEP 3: Here we will be providing details of our domain name & SSL certificate details.
Domain: Provide the name of your domain
IP Address: Select the correct IP address of your server
DNS Support: Check this option if you are managing DNS records on VestaCP
Mail Support: Check this option if you are managing email accounts on VestaCP

clicking on “ADVANCED OPTIONS” will open up settings where we can configure SSL, FTP & some other features

Alias: Provide any additional domain names for this site. Example : http://www.serverliving.com
Proxy Support: This option should be checked
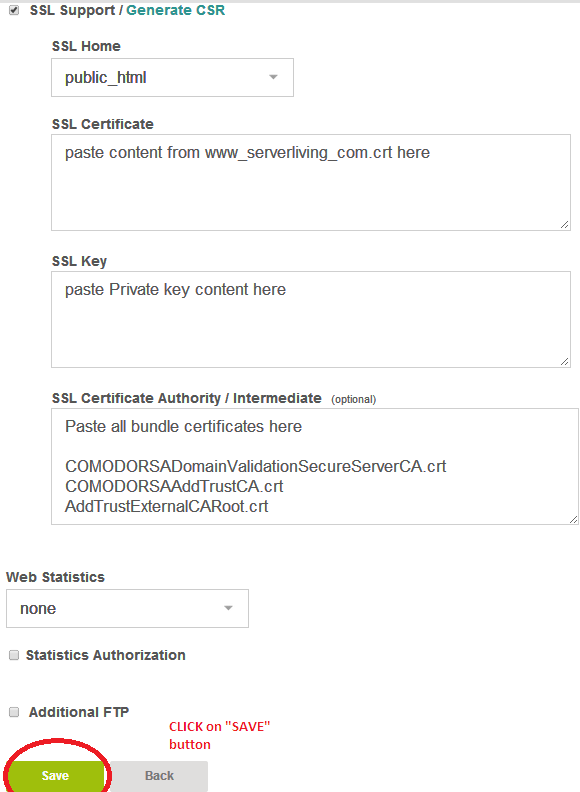
SSL Support: Enable this option & install your SSL certificate as below

SSL Home: You can leave it as default public_html or it needs to be changed to public_shtml if you want to serve HTTPS site from this directory.
SSL Certificate: Paste the contents from www_serverliving_com.crt
SSL Key: Paste the private key which you generated using https://csrgenerator.com/

SSL Certificate Authority/Intermediate:
Combine the following certificates into one file using text editor & paste the contents in this section.
(Maintain the correct order as shown below)

COMODORSADomainValidationSecureServerCA.crt
COMODORSAAddTrustCA.crt
AddTrustExternalCARoot.crt

Once all the entries are added. Save the configuration by clicking “SAVE” button.

14

If the installation is successfull, you should see message saying “Domain has been added successfully”

Let me know if you have any trouble setting up SSL.


Quick Command to Clear Email Queue in Exim Server

I have occasionally experienced SPAM emails on  some Linux servers running Exim & observed that there were huge number of emails stuck in the Email Queue.

I use the following quick command to remove all the Emails from the Queue. This command needs to be executed as root user.

exim -bp | exiqgrep -i | xargs exim -Mrm

We have to wait for some time until this command clears the whole Queue, It might take few minutes depending on the Server specs you have.